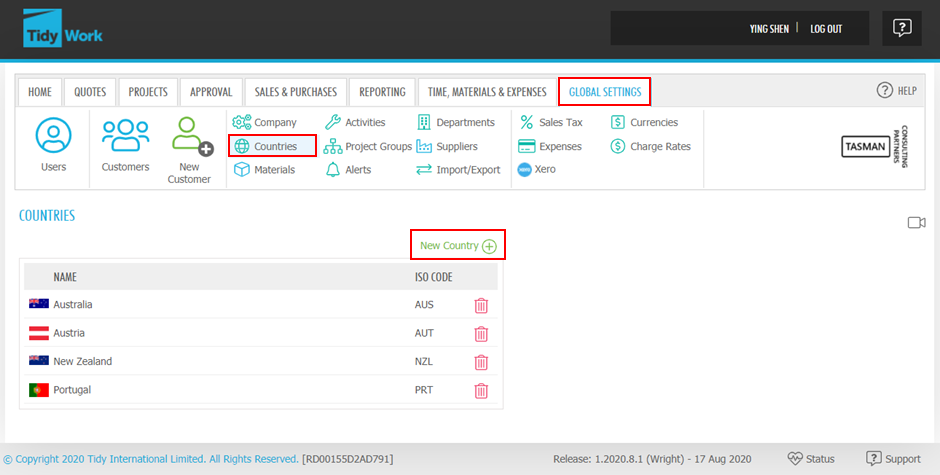
The countries tab is an easy way to add or remove countries relevant to your business (e.g. the country a customer or supplier is located). Once added, they are available via a drop-down list when creating or adding customers or suppliers.
Set up your account in the global settings of Tidy
Set up my console
The my console screen allows you to create reports on time, material, and expense entries.
Set up resource dashboard
This tab is visible to Resource administrators. The resource dashboard allows you to track your resources in one place.
Set up Microsoft project integration
This add-in is only available on Project plans 3 and 5, and Project Professional 2019. This add-in enables you to easily import resources from Tidy into Microsoft Project and export your projects and resources from Microsoft Project into Tidy.
Set up manager dashboard
This tab is visible to Project managers. The manager dashboard allows you to track your business performance in one place.
How to subscribe to TidyWork
This guide explains how to subscribe to TidyWork.
Setup Xero payroll (only Australia)
Currently only Xero Payroll Australia is supported. Ensure that Xero has the Payroll feature enabled as part of your subscription.
Set up Xero
TidyWork can connect with specific materials/freight accounts in Xero to help you better manage your business.
Set up users actions on behalf
This can be used to get a complete view of the project, even if not all resources are using TidyWork to enter their time and materials.
Set up users
this guide explains how to add or users, and explains the information found under each tab in the users section.
Set up suppliers
This is where you can add, edit, and view your suppliers. Once created they will be available for selection when completing a purchase order.
Set up your material items
This is where you can add material items. Materials are essentially your stock.
Set up a customer portal
The Customer Portal is where your customers can view the details of projects in which they are the selected customer. Only charge, not cost, information will show up and they will not be able to edit any details. Visibility of each project can also be set on an individual project basis.
Set up customers
This guide shows you how to set up your customers. If you integrate with Xero, you can import all your customers straight from Xero. If you don’t integrate with Xero, this guide also explains how to add customers without Xero.
Set up departments
Departments are used to populate a drop down list screen in the Add/edit new user screen to enable you to select a department for each TidyWork user.
Set up activities
A Task is typically a small goal of your organisation. It is achieved by performing activities. Project Managers are responsible for deciding on the tasks that must be achieved to complete a project. Project administrators can add to the pool of activities.
Set up charge rates
Global charge rates are available for selection as a default external charge rate for a particular user or for an alternate charge rate on a project when allocating resource. These rates enable variable charge rates for any particular resource on a project.
Set up alerts
Alerts can be set to notify you when profitability, milestones, budget, earned value, time, utilisation, etc. exceed or fail to meet the set threshold
Set up countries
The countries tab is an easy way to add or remove countries relevant to your business (e.g. the country a customer or supplier is located). Once added, they are available via a drop-down list when creating or adding customers or suppliers.
Set up currencies
Here you can set up the currencies for your company. To enable multiple currencies you need the Jet plan.
Set up your company settings
The company tab allows you to fill out all necessary information about your company, including employment contracts, sales and purchases, quotes/ proposals, etc.
Set up your expenses
Expense categories and expense types are used to populate drop down lists within Expense entry. They are required information and must be selected when entering an expense against a project.
Set up your project groups
Project groups are used to populate a drop-down list available when creating and editing a new project. This is required information. These groups are then used to group your projects when they are displayed on the heat map and dashboards.
Set up your sales tax
The Sales tax tab allows you to add any sales tax options relevant to your business. You can add as many as you need. These values can also be mapped back to Xero.
Set up your custom templates
Under the templates tab can customise templates for proposals, quotes, orders, etc. and set a default option for each.
Bulk Imports
Learn how to import data in bulk to your Tidy account
How to bulk import users
This feature allows you to quickly import your users in bulk.
How to bulk import suppliers
This feature allows you to bulk import your suppliers.
How to bulk import materials
This feature allows you to bulk import your materials in bulk.
How to bulk import customers
This feature allows you to quickly import your customers in bulk.
Purchasing
Learn how to complete purchasing tasks within your Tidy account
How to invoice items separately
This guide explains how to invoice tasks, times, materials, and expenses on a project separately.
How to search for a material item by reference
TidyWork allows you to add material items to your Purchase orders or Sale orders, by searching for them using their reference.
How to view a purchase order
In some cases, you receive partially from a Purchase Order. TidyWork allows you to split Purchase Orders.
How to split a purchase order
In some cases, you receive partially from a Purchase Order. TidyWork allows you to split Purchase Orders.
How to receive a purchase order
This guide explains how to receive a purchase order in order to accept the stock into your system.
How to view the purchase order history
This guide explains how to view purchase order histories.
How to view the invoice queue
This guide explains how the invoice queue feature in TidyWork works and what it does.
How to view invoice history
This guide explains how to view an invoice’s history.
How to edit a purchase order
This guide explains how to make any edits to your purchase orders. You can only edit purchase orders when they are drafts.
How to create a purchase order
This guide explains how to create a purchase order.
How to assign a purchase order to a project
This guide take you through the steps to assign a purchase order to a set project.
Projects
Learn how to complete projects within your Tidy account
How to run a report
In TidyWork, there are many different types of reports that are available to run. The categories of these reports are: Project Reports, Time & Productivity Reports, Operational Reports, Sales Reports, Stock Reports, Administration Reports.
How to export data
This guide explains how to export project data.
How to approve expenses
To Approve expenses, you need to have the user role of Expense Approver and be assigned to the project you are approving materials for.
How to approve materials
To Approve Material, you need to have the user role of Material Approver and be assigned to the project you are approving materials for.
How to enter materials
This guide explains how to enter materials for a project.
How to enter expenses
This guide explains how to enter expenses for a project.
How to approve time
To Approve Time, you need to have the user role of Time Approver and be assigned to the project you are approving time for.
How to enter time
This guide explains how to enter time for a project.
How to enable combined project invoices
Combined Project Invoices is only available on the Rocket plan of TidyWork and TidyBuild, and on TidyEnterprise. With Combined Project Invoices enabled, Project items ready for invoicing on the Invoice Queue which have the same customer, can be combined onto one invoice.
How to clone a project
This guide explains how to easily clone a project and all of it’s details.
How to edit a project
This guide explains how to edit the details of a project, only when it is a draft.
How to view a project
This guide explains how to view all the details of a project.
How to use the project calendar
This guide explains how the project calendar works.
How to schedule resources and book time
If the Resource Scheduling feature is enabled for your organisation, Project Managers will be able to write future booked time against resources, and will be able to see the allocations when adding time entries. This time will be visible to your Time Writers when they add time entries.
How to create a project
Tidy Work provides two ways to create a new project: quick project and new project.
How to invoice a project in advance
This document is for those businesses who invoice a project in advance before starting the project and recording time/materials. How this is done in TidyWork depends on whether the project is Time & Materials or Fixed Price project.
How to add project adjustments to projects
This guide explains how to add project adjustments to a project, this allows you to make any changes that weren’t accounted for when the project was originally created.
How to add time adjustments to projects
This guide explains how to add time adjustments to a project, this allows you to make any changes that weren’t accounted for when the project was originally created.
How to clone a quote
This feature allows you to easily replicate existing quotes.
How to edit a quote
This feature allows you to make changes to the details of your existing quotes.
How to create a quote
Quotes allow you to present the estimated time, cost, material, tasks, etc. for a project.
How to view a quote
This guide explains how to view all the details of a quote.
Sales and Pricing
Learn how to manage sales and pricing within your Tidy account
How to export payroll
You can easily export payroll data from your Tidy account to a connected Payroll provider that Tidy offers. Tidy offers integrations with multiple Payroll providers. These are: Smart Payroll, iPayroll, IMS Payroll
Inventory
Learn how to manage your inventory in your Tidy account
How to clone a material
This guide explains how to easily clone materials and all of it’s details.
How to disable and delete materials
If you are no longer using certain material items, you can choose to disable them. If there is no purchase or sale history against a specific material item, you can delete it. To disable a material item, you first need to have the right permissions. Users with Purchaser, or System Administrator permission can disable material items.