


If you buy in stock or materials in one form of unit (e,g. roll, sheet, bag, weight, etc.) and sell or consume in another type of the same or different unit of measure (square area, linear length, smaller bag size, volume, etc.), then this feature will help you.
Want to view this guide all at once?
Download PDF
To use this feature, the parent item (the item to be purchased from the supplier e.g. a box of 1000 screws) and the child item(s) (the item(s) to be sold e.g. a single screw) need to be entered as Material Items in Tidy.
With the Material Conversion feature turned on, you will see the Conversion icon on your Material Item display view.
This allows you to define how the material item is converted and its new form or new unit of measure.
Clicking the Conversion button opens the Material Conversion dialogue.

Scenario 1. Conversion with a single child item
Step 1.
Select the Parent material item and click Add Child Item.
Enter the Child item and the quantity that the Parent converts into and click Save.
In this example the Parent box will be converted to 1000.
If you want Tidy to automatically make this conversion every time the material item is received on a purchase order, check the Automatically Convert On Order Receipt checkbox.
To make the conversion click the Convert button.

Step 2.
Enter the quantity of Parent items to be converted from each location and click Convert.

Step 3.
You will see the stock level of the Parent has decreased and the number of conversions has increased. The stock level of the Child item has increased by the conversion factor (not seen on this screen).
Make further conversions of this material item or close the Material Conversion dialogue box.

Scenario 2. Conversion with multiple options for Child items
Step 1.
In this scenario, the Parent item can be broken down into different Child items when required.
In this example the Parent box of 3000 can be converted in to; 30 lots of 100 or 60 lots of 50 or 6 lots of 500. Select which Child item you wish to convert to and click Convert.

Step 2.
This is the same process as above, but with multiple options of Child items it is no longer possible to automaticallyconvert into Child items on receipt of the order.
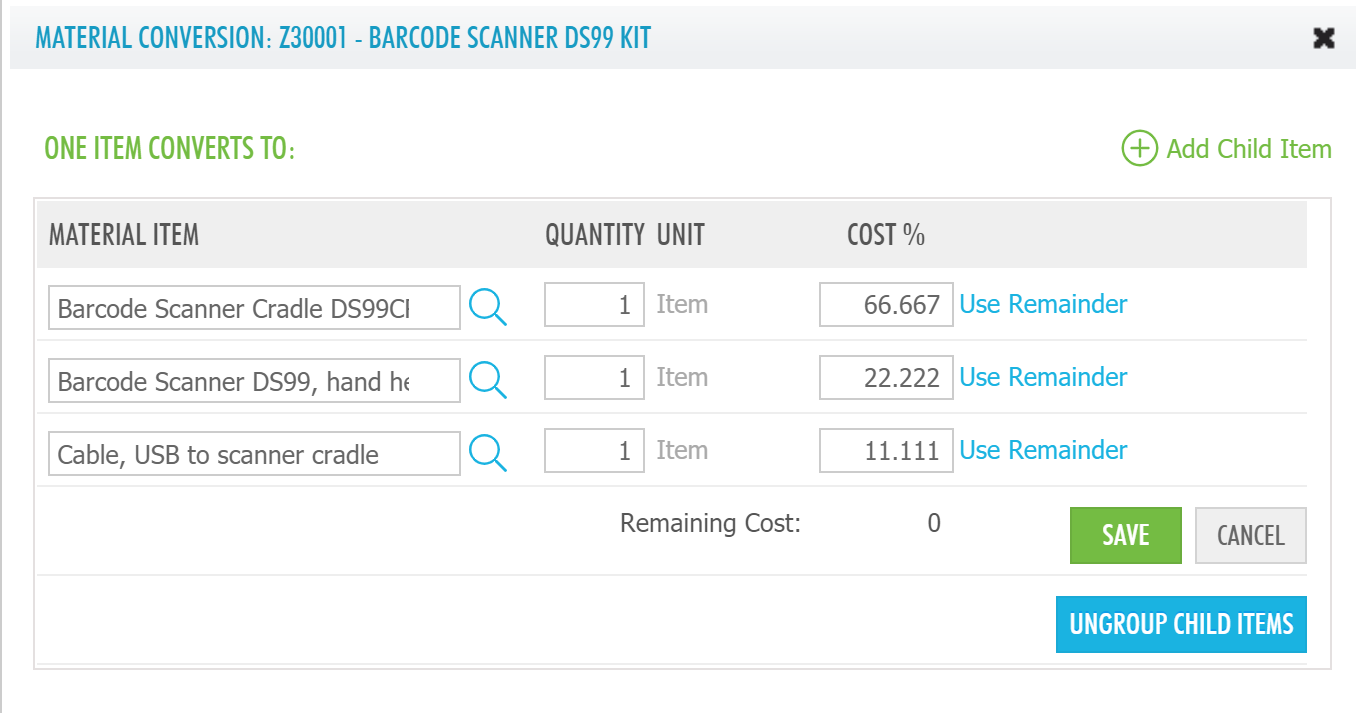
Scenario 3. Convert a "kit" into its component items
Step 1.
In this example we will convert a scanner kit into its component parts. Add the components as Child items and click Combine Child Items into Group.

Step 2.
Click on one of the edit buttons to change how the cost of the parent will be allocated to the Child items (by default the cost are divided equally).
The cost of the Parent item must be allocated 100% to the children, click the Use Remainder to automatically calculate the cost of the last item. Click Save.
Step 3.
As the Child items are now grouped, the conversion is now done with a single click and there is the option to do this on the receipt of the order.

Scenario 4. Convert purchased item to a different unit
In this example, we purchase compost by the cubic metre and convert to kg (500kg/m3).

Auto Convert On Order Receipt
As Auto Convert was selected for the conversion of the Barcode Scanner Kit, the PO Receipt screen shows the conversion that will occur.

Want to learn more? Check out these related guides


